Lab 3: General Troubleshooting
In this lab exercise, you will learn where to look and what to look at when an Access Policy is not successfully allowing access or not performing as intended.
Questions to ask yourself (LAB3)
- Do we have proper Network Connectivity?
- Are there any Upstream/Downstream Firewall Rules preventing APM to be reachable or to reach destination targets it requires to access?
- Do we have DNS setup properly?
- Do we have NTP setup properly?
- Are we receiving any Warnings or Error messages when we logon?
- Are there any missing dependencies?
- Time to check on our Sessions under Manage Session Menu
- What can we see from the Manage Session Menu?
- If we click the Session ID link what more information is available?
- Is Authentication Successful or is it Failing?
- Is the user receiving the proper ENDING ALLOW from the Policy?
- Time to Review the Reports information for the Session in question
- What information is available from the ALL SESSIONS REPORT?
- Can we review the Session Variables for the user’s session from the ALL SESSION REPORT? If YES then Why however If NO then WHY?
- Can the BIG-IP TMOS Resolve the AAA server by Hostname and by
Hostname.Domain?
- Is the AAA reachable over the network, no Firewalls blocking communication from BIGIP Self-IP?
Verify DNS is setup from the CLI of the BIG-IP
Perform the following steps to verify DNS is correctly configured:
- Click on the PuTTY (SSH client) to access the BIG-IP CLI
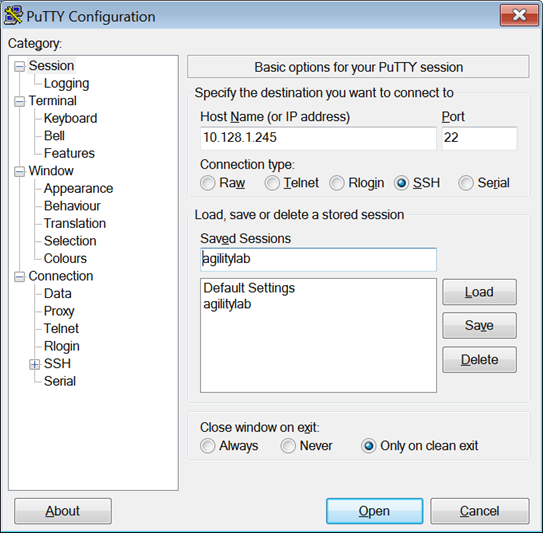
- Click on the agilitylab Saved Session and click Load
- The click on OPEN
Alternatively, you can simply double-click on the agilitylab Saved Session to open the session
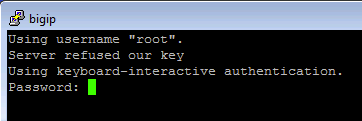
- Logon as root with password default if necessary (you should logon automatically)
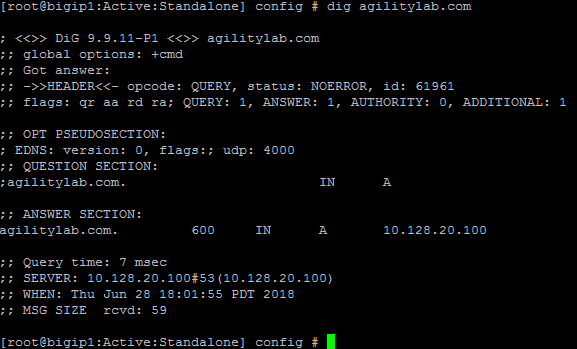
- From the CLI type dig agilitylab.com and then press enter
- The following results should be reviewed and verified.
- If DNS is properly configured you should receive the returned IP address of 10.128.20.100
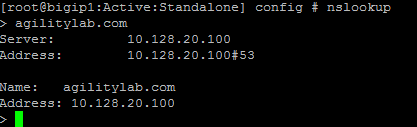
- From the CLI type nslookup and then press enter.
- Type agilitylab.com and then press enter
- The following results should be reviewed and verified.
- If DNS is properly configured you should receive the returned IP address of 10.128.20.100
- Exit nslookup by typing exit
Verify NTP is setup from the CLI of the BIGIP
Perform the following steps to verify NTP is correctly configured:

- From the CLI (via PuTTy –SSH Client) …. type ntpq –pn and then press enter.
- The following results should be reviewed.

- If time is out of sync by too much of an offset you can update the local time using the following command:date MMDDhhmmYYYY
Manage Sessions within the Access Policy Manager menu
We use the Manage Sessions menu to view general status of currently logged in sessions, view their progress through a policy, and to kill sessions when needed.
STEP 1

- Open a USER session to APM through a new browser window by navigating to your first Virtual Server IP Address created in LAB I (10.128.10.100)
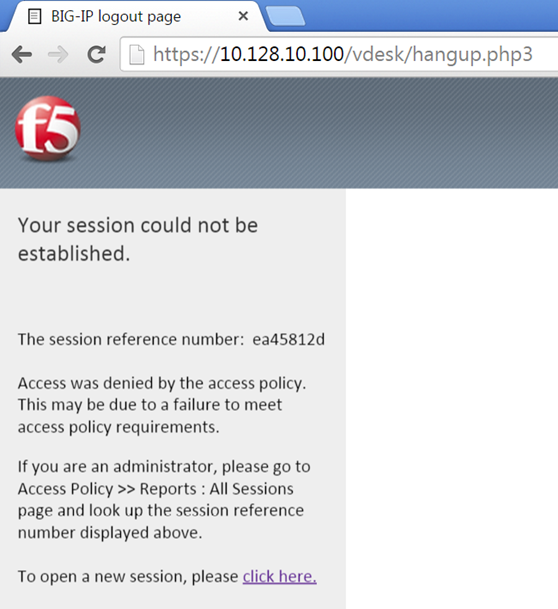
- Did you receive an error message? If so, take note of the Session Reference Number
TEST 1

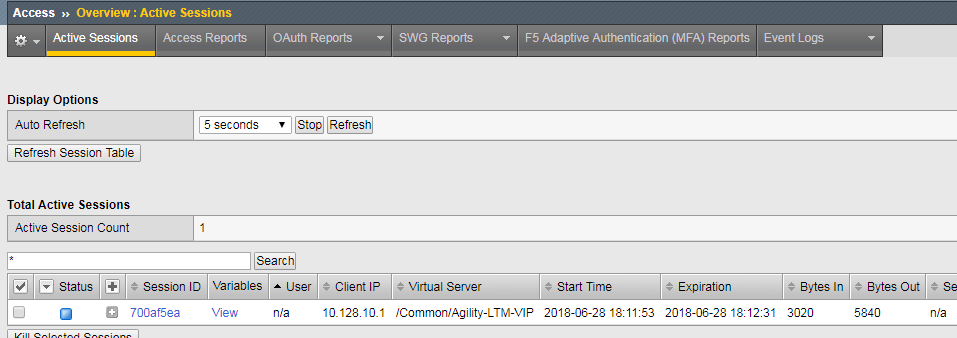
- In the browser window, you are using to manage the BIG-IP, navigate to Access Overview > Active Sessions menu.
- Review the Manage Sessions screen, is there an Active Session? If not then why?
STEP 2
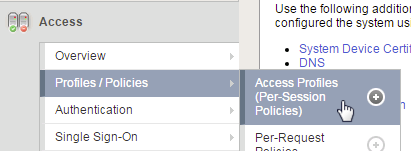
- Now open the APM Visual Policy Editor (VPE) for the policy created/loaded in LAB I by navigating to Access Profiles/Policies -> Access Profiles (Per-Session Policies) menu.

- Then click the Edit link in the row that has the name of your Access Profile you are working with currently. (Agility-Lab-Access-Profile)
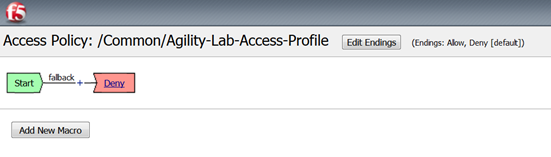
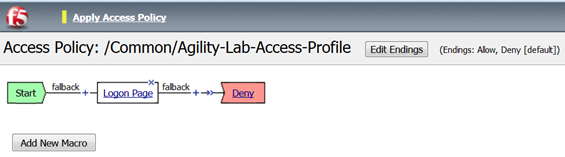
- This will either launch a new browser or new tab depending on your browsers settings to display the APM Visual Policy Editor (VPE). The first policy we created was never edited to add any additional tasks that would instruct APM on what Actions it would need to take/enforce throughout a Policy Execution for the user’s Session. So we will now adjust the policy and retest to see if we receive some new results.
- Click on the + symbol between the Start and ending Deny objects.
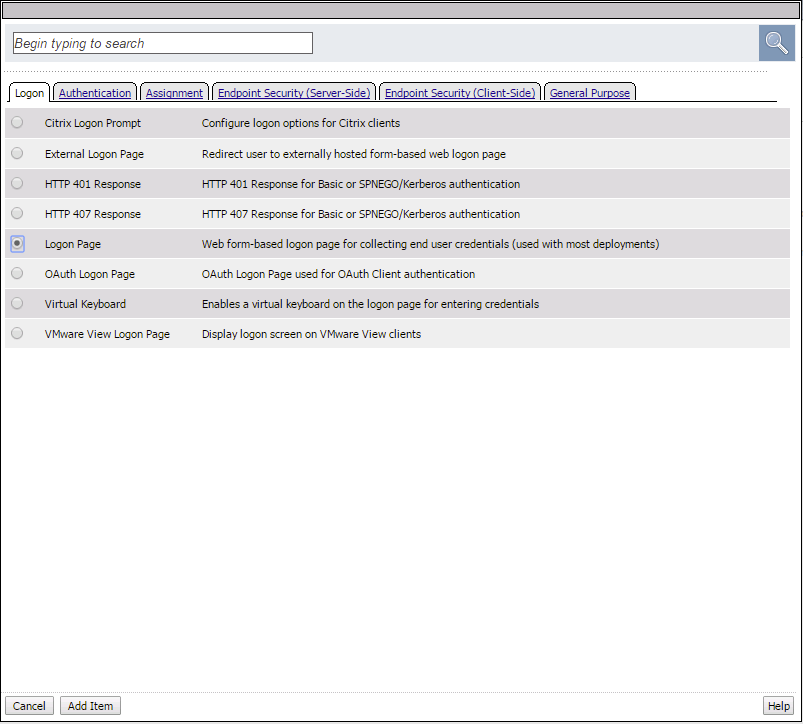
- This will pop up the Actions window where we can select from several Actions we wish to associate with our policy. On the Logon tab select the Logon Page radio button and then click the ADD ITEM button at the bottom of the page.
- Click the SAVE button on the Logon Page properties window.
- Then click the Apply Access Policy link on the top left of the page.
TEST 2
- Restart your session to APM. (https://10.128.10.100)
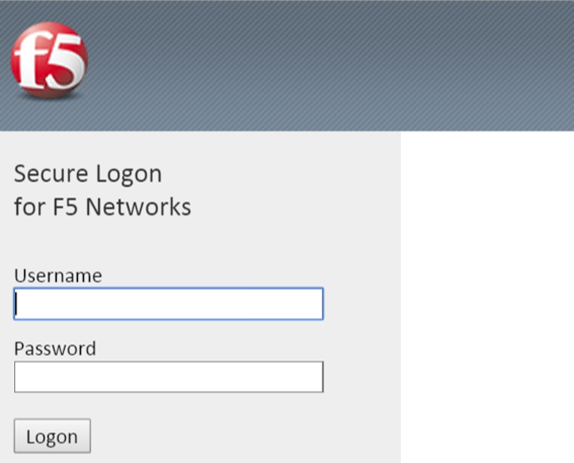
- Did you receive and error this time? Or did you receive a Logon Page?
- Open your browser or tab for managing APM and open the Active Sessions menu again.
- Is there now an Active Session displayed on the page? If you were already on this page you may need to click the Refresh Session Table button.
- What does the Status Icon look like? Is it a Green Circle or a Blue Square?
- Is your username displayed in the Logon column?
- Click on the Session ID for your session, this will open up a Session Details window.

- In the Session Details window, we can see some information about the session up to the point that the policy has executed so far.

- Further down there is a reports section titled Built-In Reports, click that to open the list of built in reports.
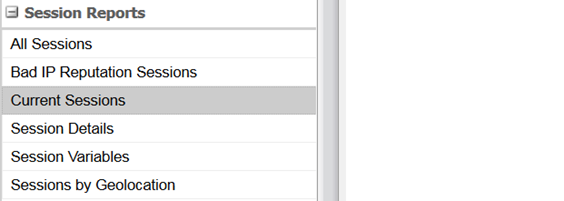
- Scroll down to see the list of Session Reports and click the Current Sessions line and select Run Report from the pop up window.
- Do you see your Session ID displayed in the list of current sessions? If not then why?
TEST 3
- Return to the browser or tab you are using for access to https://10.128.10.100. Restart a new session if necessary.
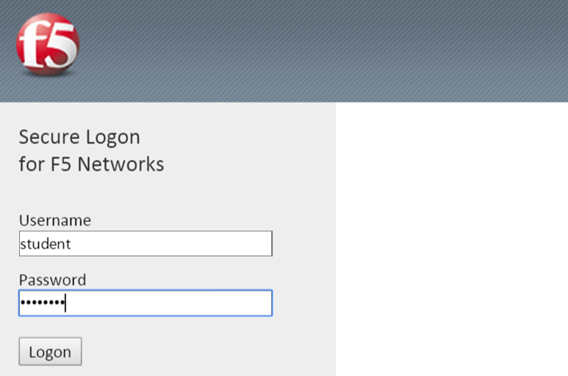
- Next logon to the APM Logon page with:
- Username: student
- Password: password
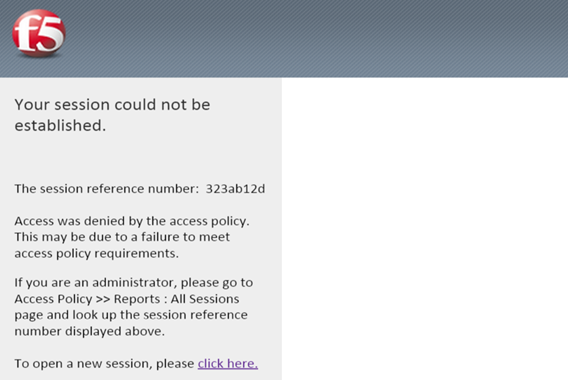
- Did you receive and error after logging on? If so note the Session Reference Number.
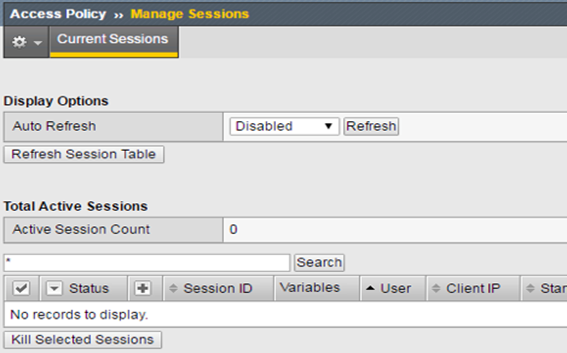
- Review the Manage Sessions menu, is your session listed?

- Navigate to Access -> Overview Access Reports. When prompted Click Run Report.

- Do you see your Session ID listed in the list of All Sessions? Is the username listed in the Logon column?
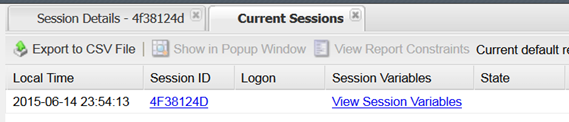
- Click the Session ID to open the Session Details window.
- Do you now see more information in this Sessions Details compared to the previous one we reviewed?
- Is the username listed in the details?
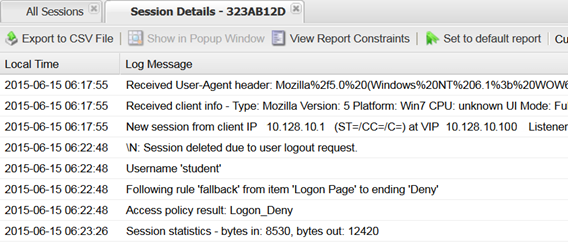
- In the Session Details screen we can see some important troubleshooting information, for example just below the username row we see a line that states that the Policy followed a path or branch called Fallback out of the Logon Page object to an Ending “Deny” thus the Access Policy Result was Logon_Deny.

- Now click back on the All Sessions tab at the top.
- In the row for this session look to the right of the Logon column. You will see the next column states that the session is not Active. Now click the View Session Variables link in the next column.
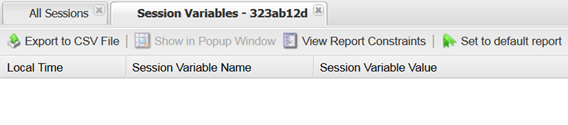
- Do you see a lot of information recorded for Session Variables for this session? If not, then why?