Lab 1: SAML Service Provider (SP) Lab

The purpose of this lab is to configure and test a SAML Service Provider (SP). Students will configure the various aspects of a SAML Service Provider, import and bind to a SAML Identity Provider (IdP) and test SP-Initiated SAML Federation.

Objective:

  • Gain an understanding of SAML Service Provider(SP) configurations and its component parts
  • Gain an understanding of the access flow for SP-Initiated SAML

Lab Requirements:

  • All Lab requirements will be noted in the tasks that follow
  • Estimated completion time: 25 minutes

Lab 1 Tasks:

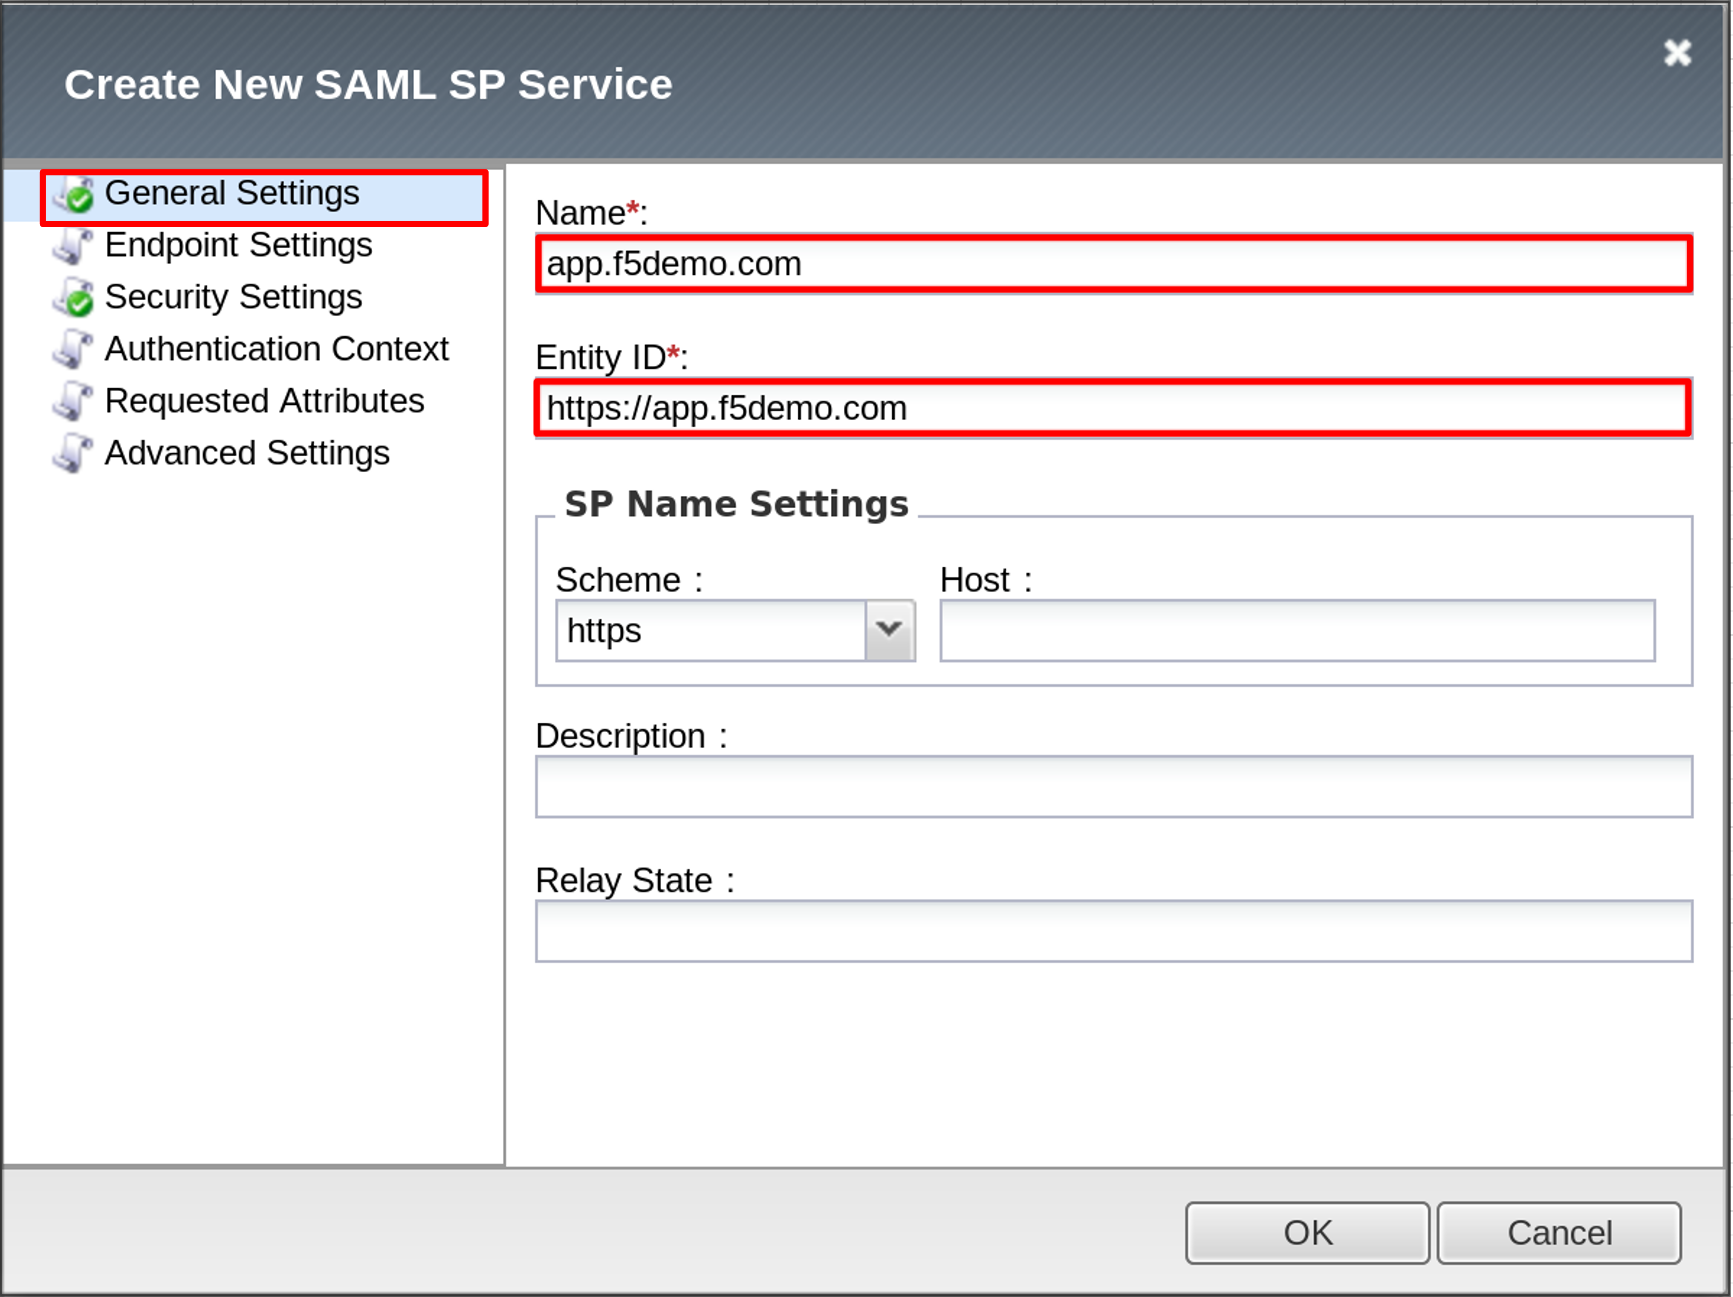
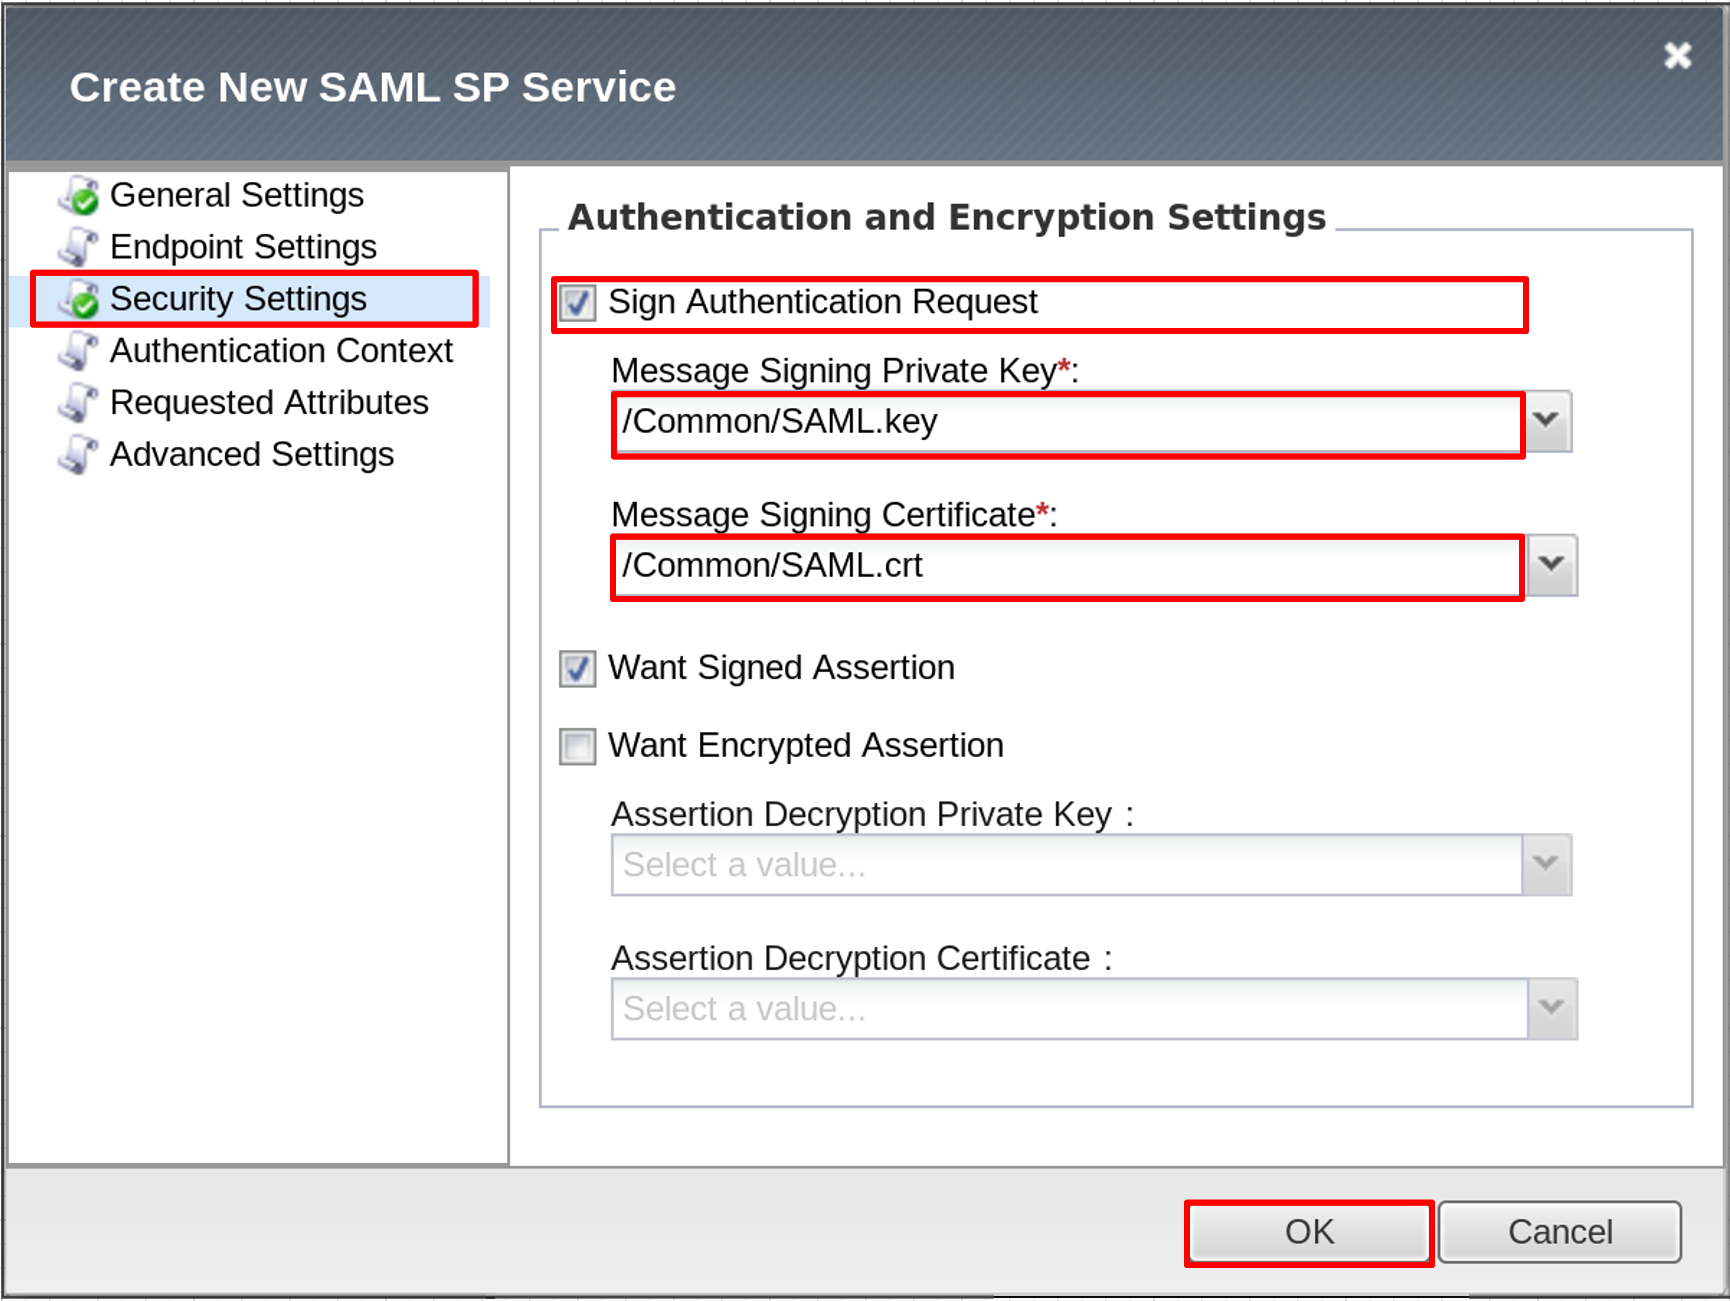
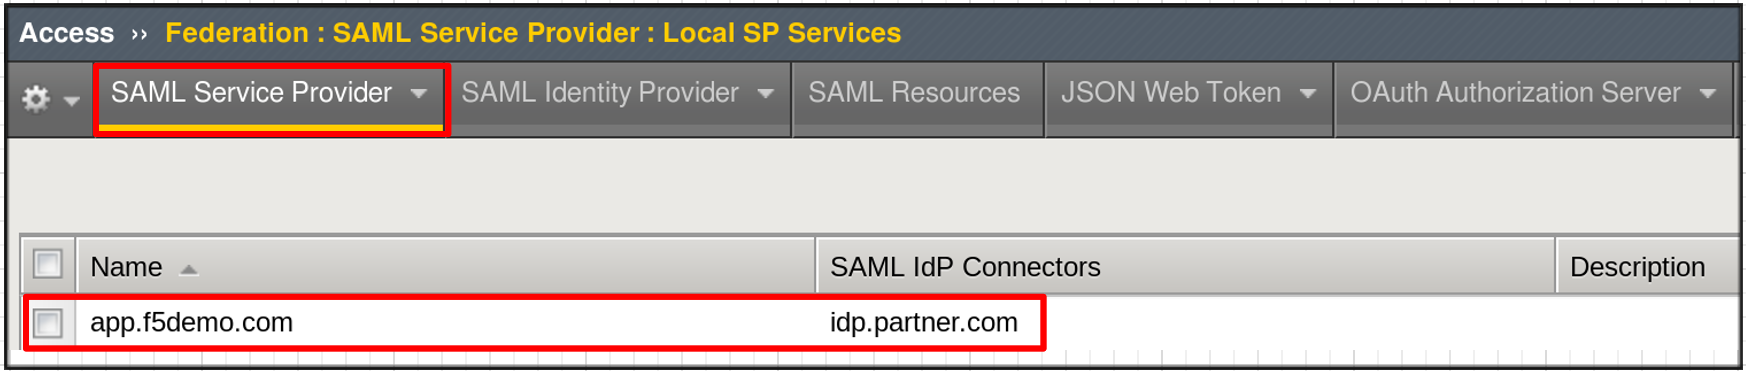
TASK 1: Configure the SAML Service Provider (SP)

Refer to the instructions and screen shots below:

  1. Login to your lab provided Virtual Edition BIG-IP

  2. Begin by selecting: Access -> Federation -> SAML Service Provider ->

    Local SP Services

  3. Click the Create button (far right)

image001
  1. In the Create New SAML SP Service dialogue box click General Settings in

    the left navigation pane and key in the following as shown:

    • Name: app.f5demo.com
    • Entity ID: https://app.f5demo.com

    Note: The yellow box on Host will disappear when the Entity ID is entered.

image002
  1. Click on the Security Settings in the left navigation menu.
  2. Check the Sign Authentication Request checkbox
  3. Select /Common/SAML.key from drop down menu for the Message Signing Private Key
  4. Select /Common/SAML.crt from drop down menu for the Message Signing Certificate
  5. Click OK on the dialogue box
image003

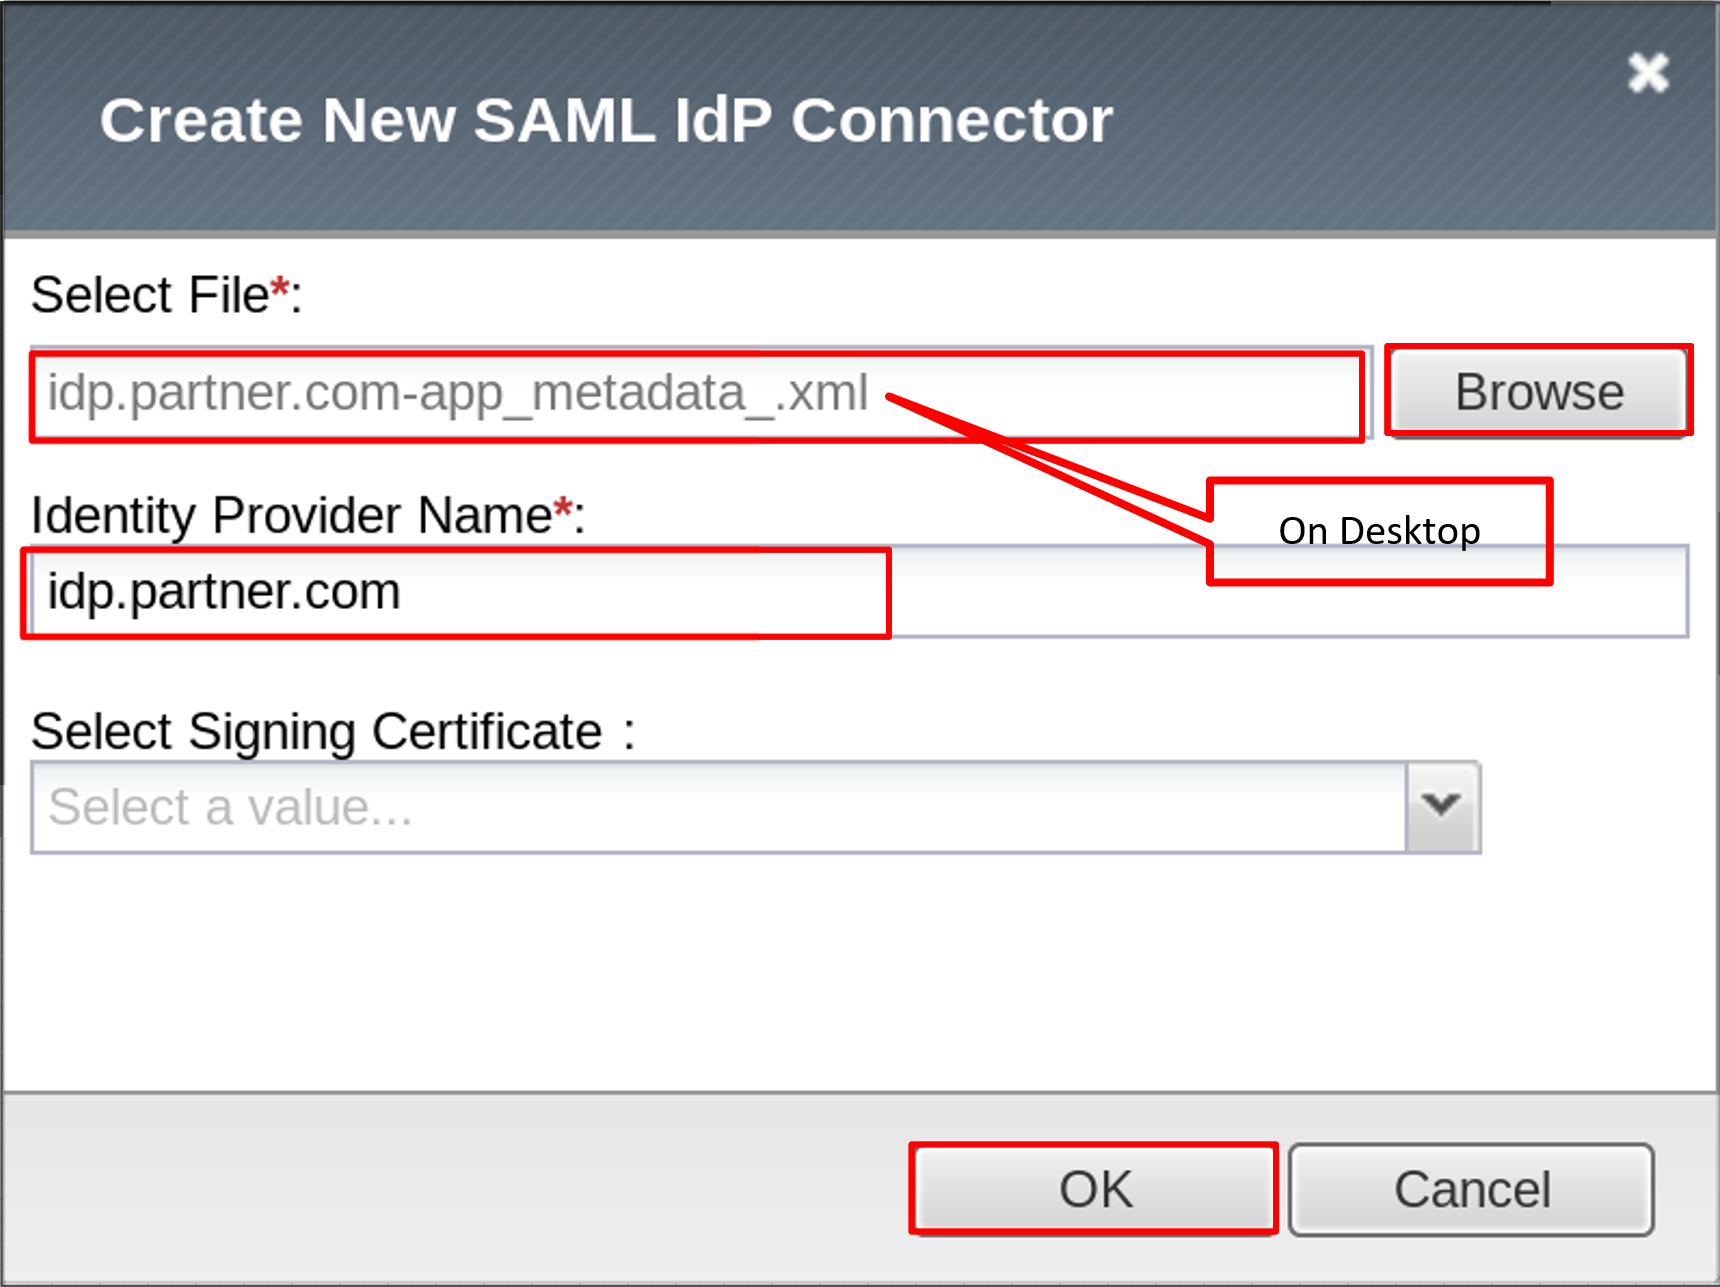
TASK 2: Configure the External SAML IdP Connector

Refer to the instructions and screen shots below:

  1. Click on the Access -> Federation -> SAML Service Provider ->

    External IdP Connectors or click on the SAML Service Provider tab in the

    horizontal navigation menu andselect External IdP Connectors.

  2. Click specifically on the Down Arrow next to the Create button (far right)

  3. Select From Metadata from the drop down menu

image004
  1. In the Create New SAML IdP Connector dialogue box, click Browse and select

    the idp.partner.com-app_metadata.xml file from the Desktop of your jump host.

  2. In the Identity Provider Name field enter the following: idp.partner.com

  3. Click OK on the dialogue box.

Note: The idp.partner.com-app_metadata.xml was created previously. Oftentimes, iDP

providers will have a metadata file representing their IdP service. This can be

imported to save object creation time as it has been done in this lab

image005

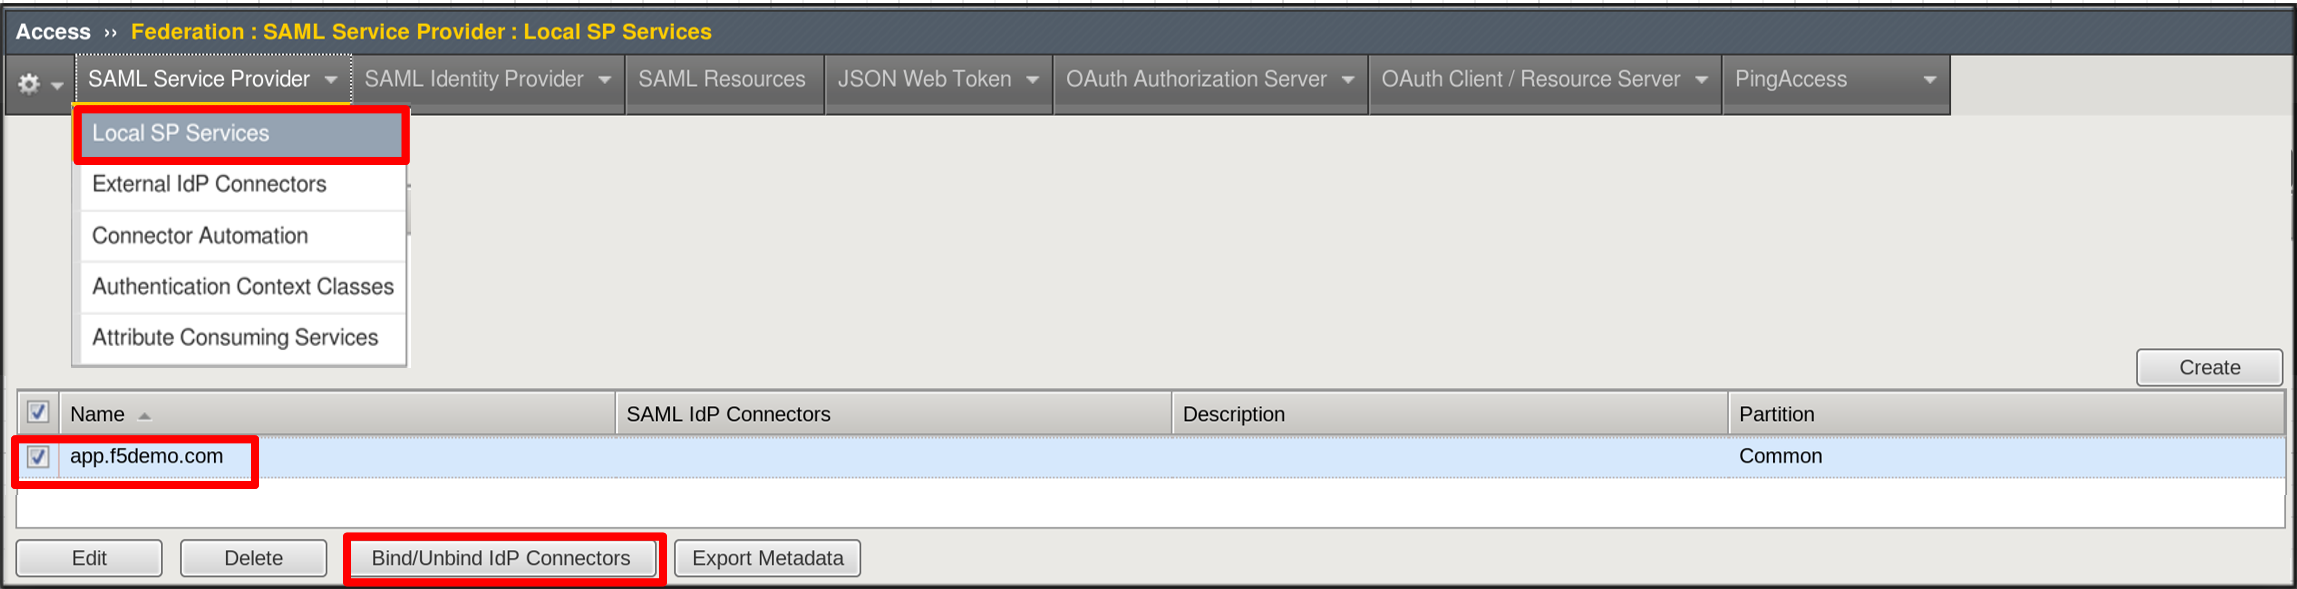
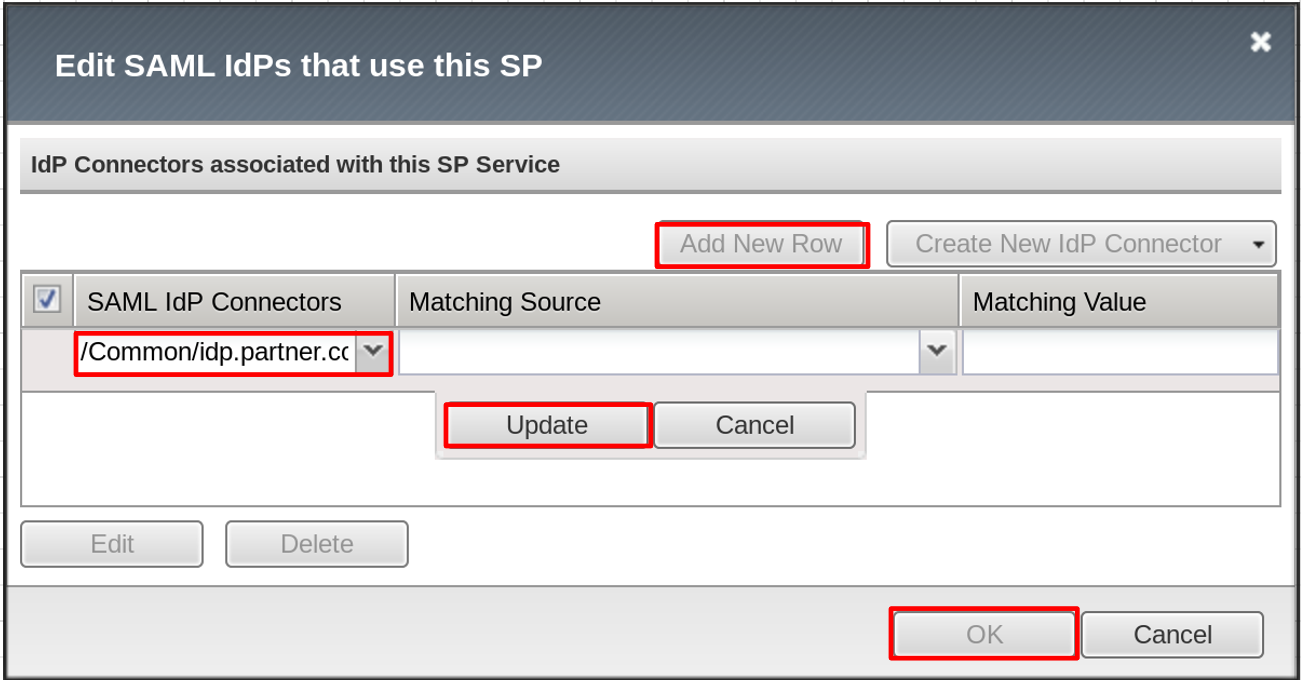
TASK: 3: Bind the External SAML IdP Connector to the SAML SP

Refer to the instructions and screen shots below:

  1. Click on the Local SP Services from the SAML Service Provider tab in the

    horizontal navigation menu.

  2. Click the Checkbox next to the previously created app.f5demo.com and select

    Bind/Unbind IdP Connectors button at the bottom of the GUI.

image006
  1. In the Edit SAML IdP’s that use this SP dialogue box click the Add New Row button

  2. In the added row click the Down Arrow under SAML IdP Connectors and select the

    /Common/idp.partner.com SAML IdP Connector previously created.

  3. Click the Update button and the OK button at the bottom of the dialogue box.

image007
  1. Under the Access -> Federation -> SAML Service Provider ->

    Local SP Services menu you should now see the following (as shown):

    • Name: app.f5demo.com
    • SAML IdP Connectors: idp.partner.com
image008

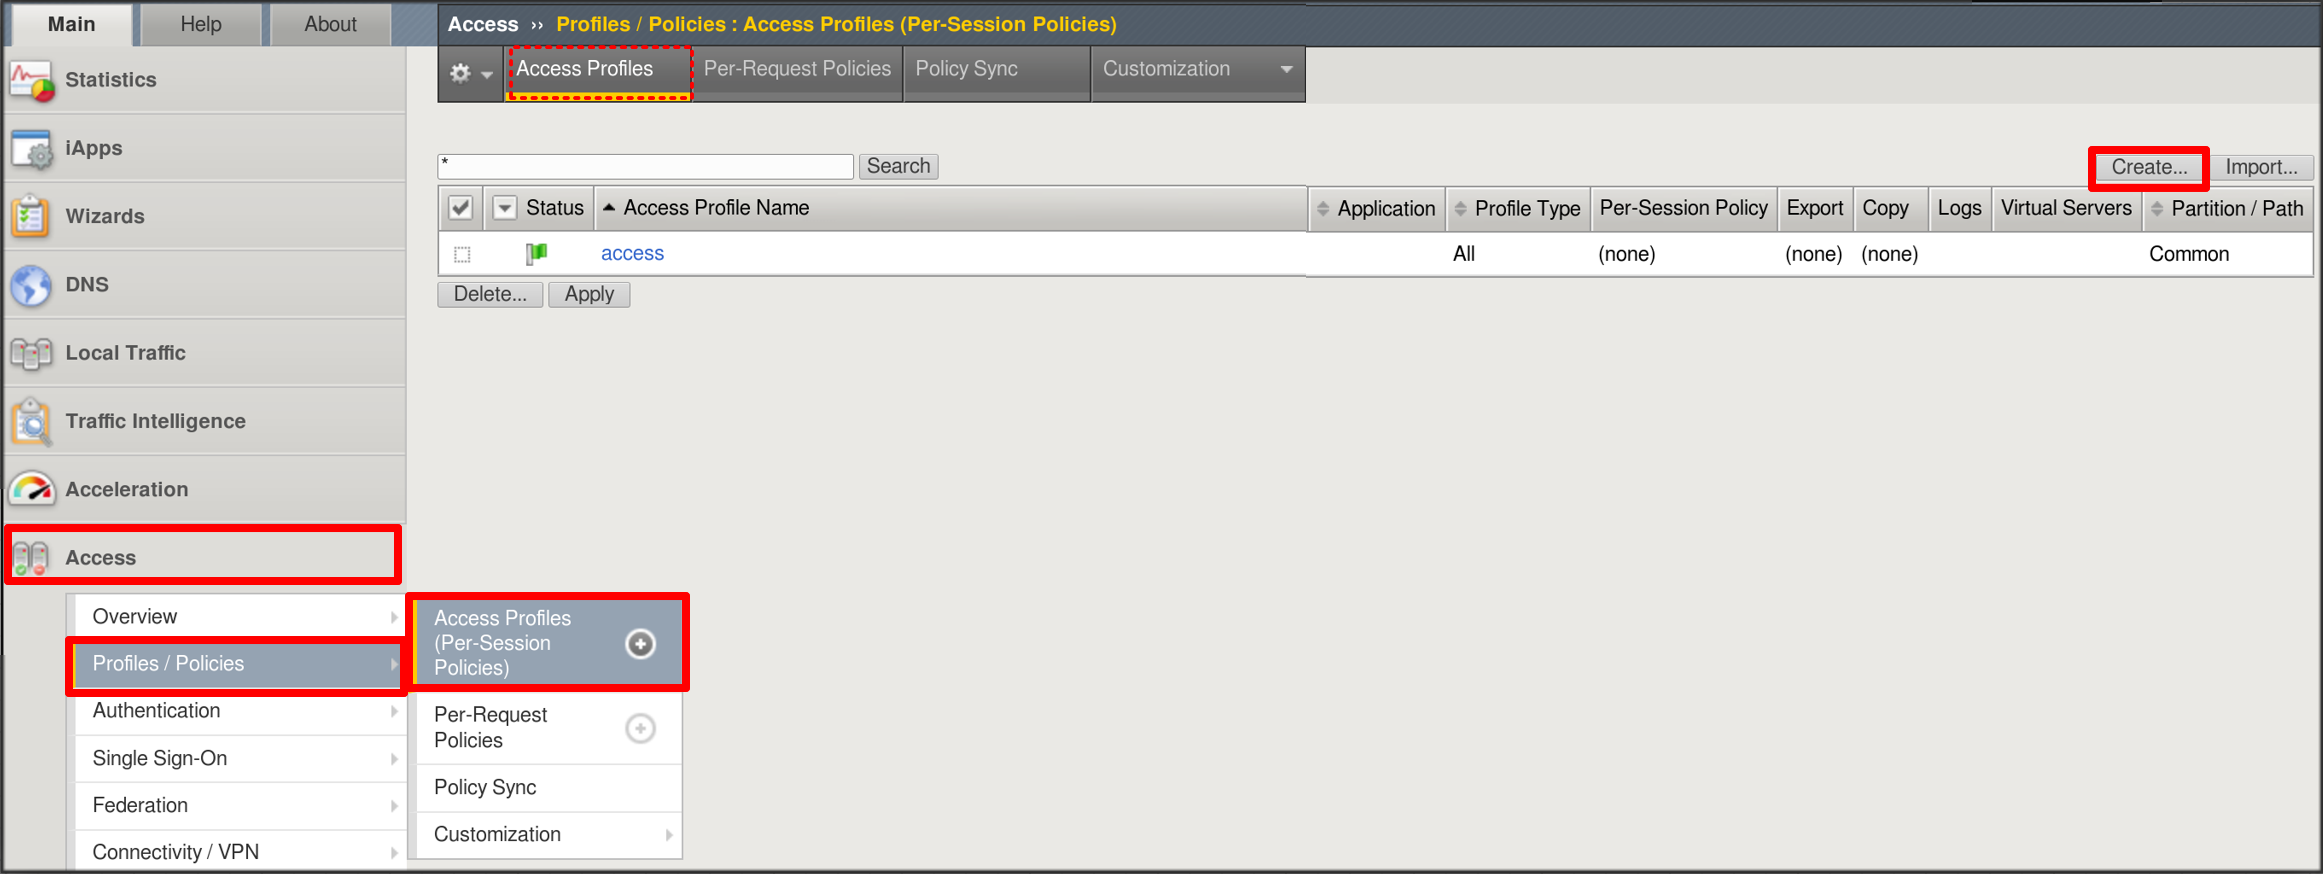
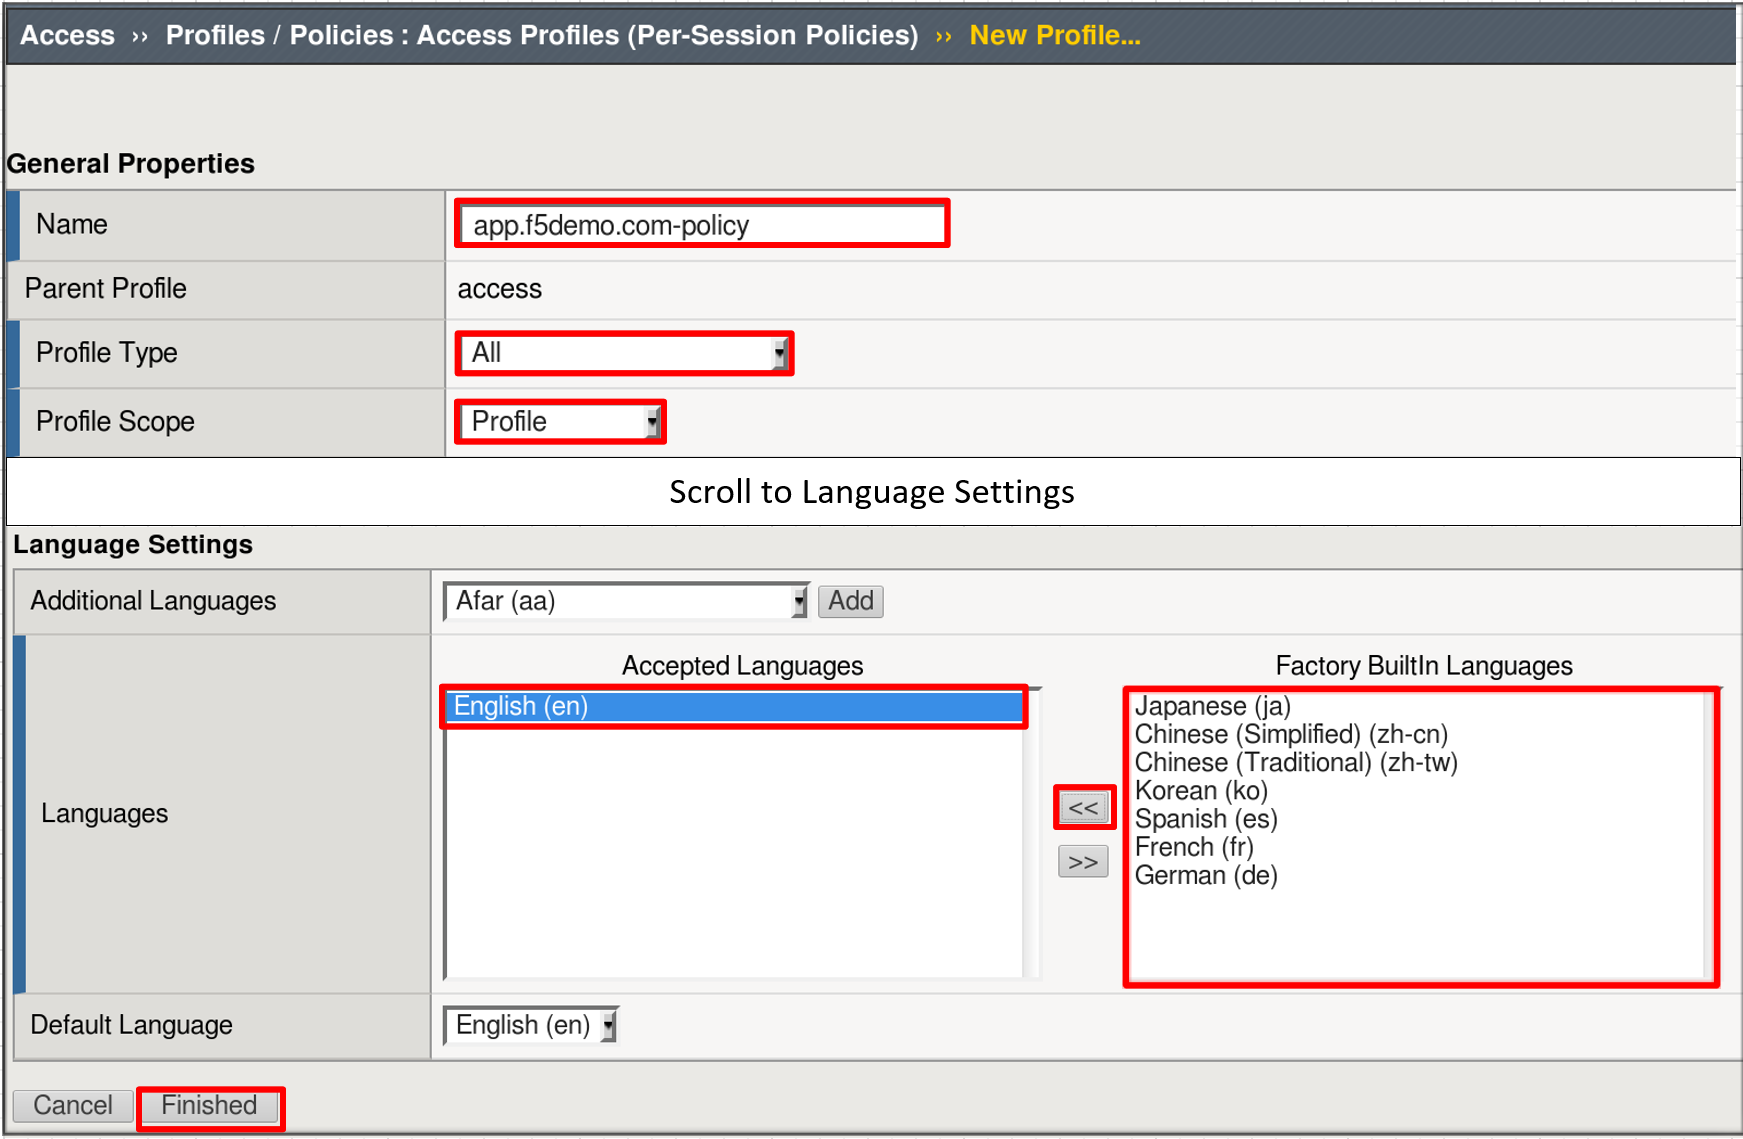
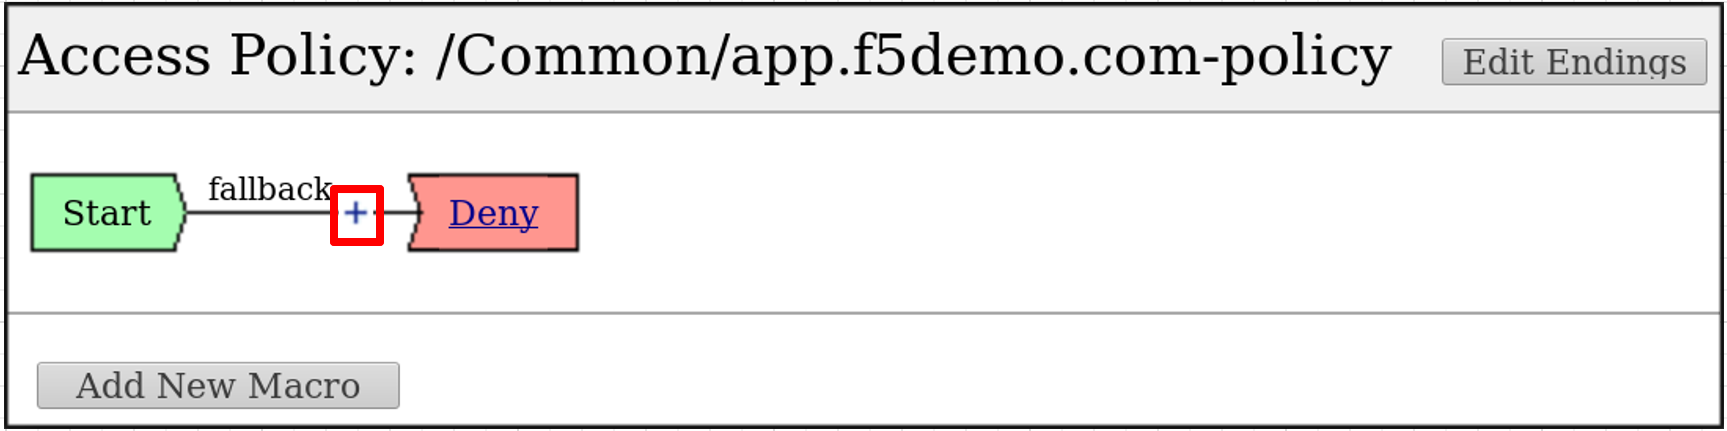
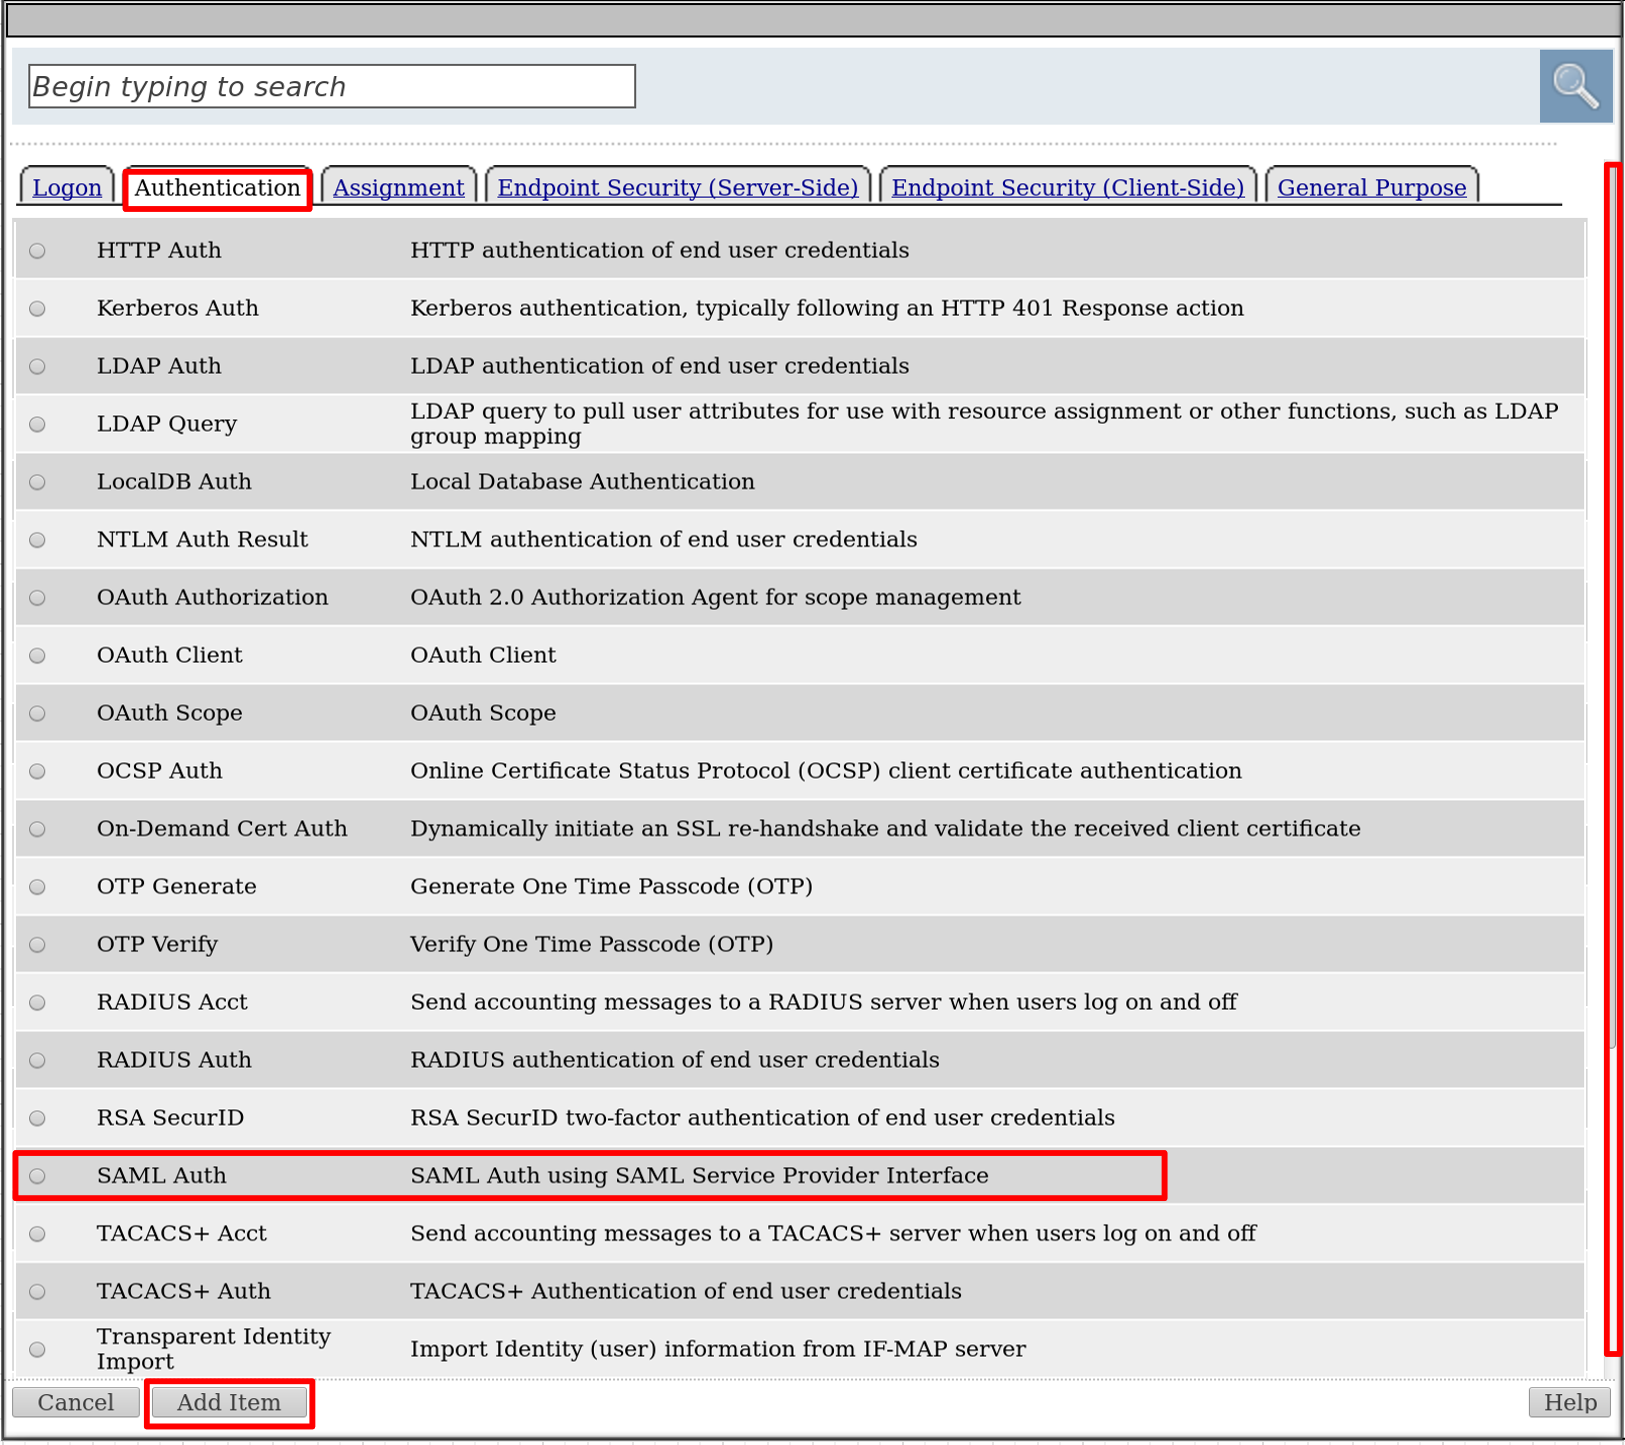
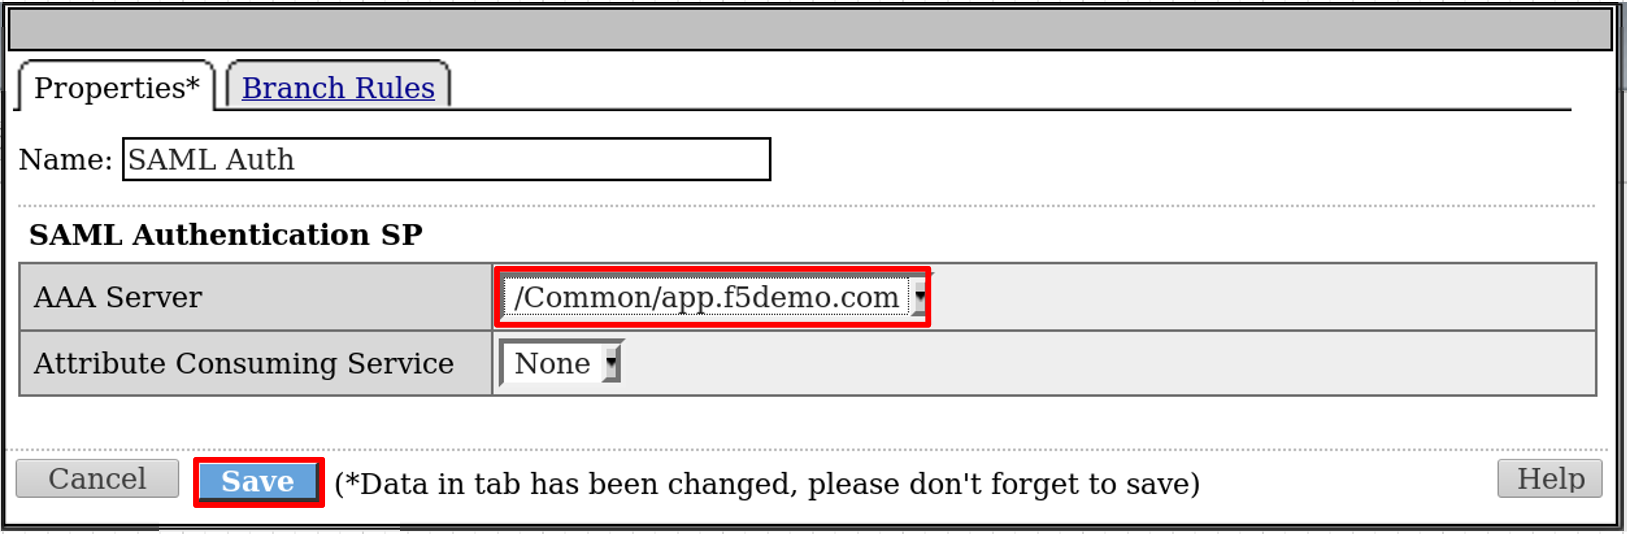
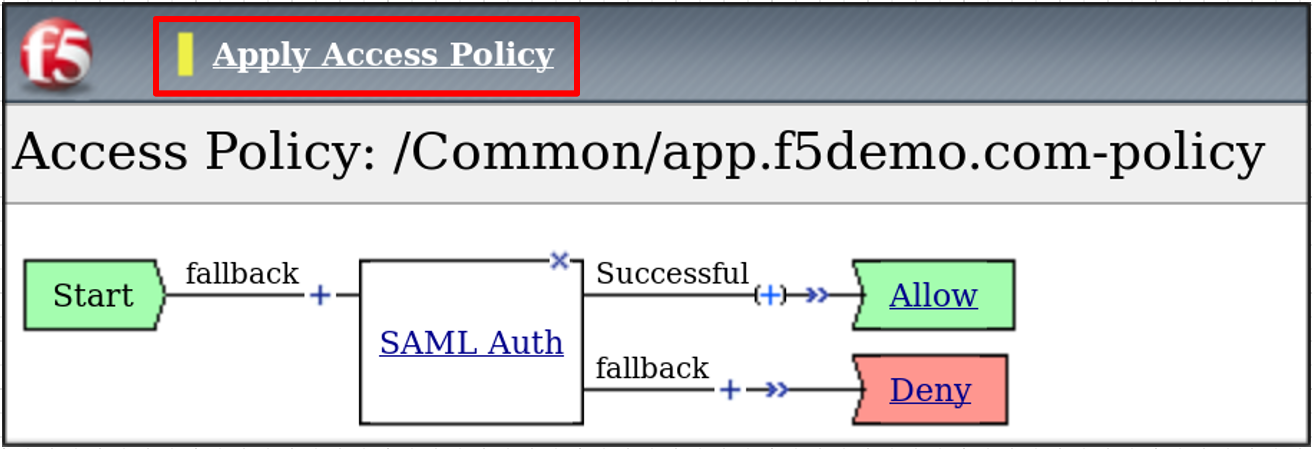
TASK 4: Configure the SAML SP Access Policy

Refer to the instructions and screen shots below:

  1. Begin by selecting: Access -> Profiles/Policies -> Access Profiles (Per-Session Policies)
  2. Click the Create button (far right)
image009
  1. In the New Profile window, key in the following as shown:

    • Name: app.f5demo.com-policy
    • Profile Type: All (from drop down)
    • Profile Scope: Profile (default)
  2. Scroll to the bottom of the New Profile window to the Language Settings

  3. Select English from the Factory Built-in Languages menu on the right and click

    the Double Arrow (<<), then click the Finished button.

image010
  1. From the Access -> Profiles/Policies -> Access Profiles (Per-Session Policies),

    click the Edit link on the previously created app.f5demo.com-policy line.

image011
  1. In the Visual Policy Editor window for the /Common/app.f5demo.com-policy, click

    the Plus (+) Sign between Start and Deny.

  2. In the pop-up dialogue box select the Authentication tab and then click the Radio

    Button next to SAML Auth. Once selected click the Add Item button.

image012

image013

  1. In the SAML Auth configuration window, select /Common/app.f5demo.com from the

    SAML Authentication, AAA Server drop down menu.

  2. Click the Save button at the bottom of the configuration window.

image014
  1. In the Visual Policy Editor select the Deny along the Successful branch
following the SAML Auth
  1. From the Select Ending dialogue box select the Allow Radio Button and then
click Save.
image015
  1. In the Visual Policy Editor click the Apply Access Policy (top left) and close
the Visual Policy Editor.

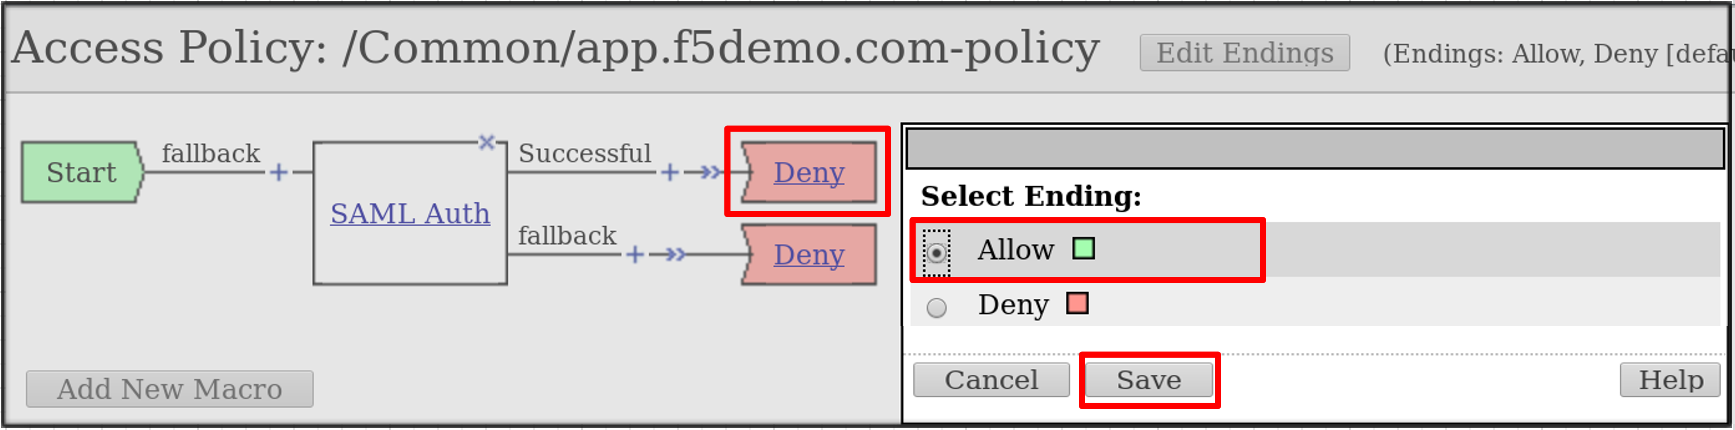
Note: Additional actions can be taken in the Per Session policy (Access Policy). The lab

is simply completing authentication. Other access controls can be implemented based on the

use case

image016

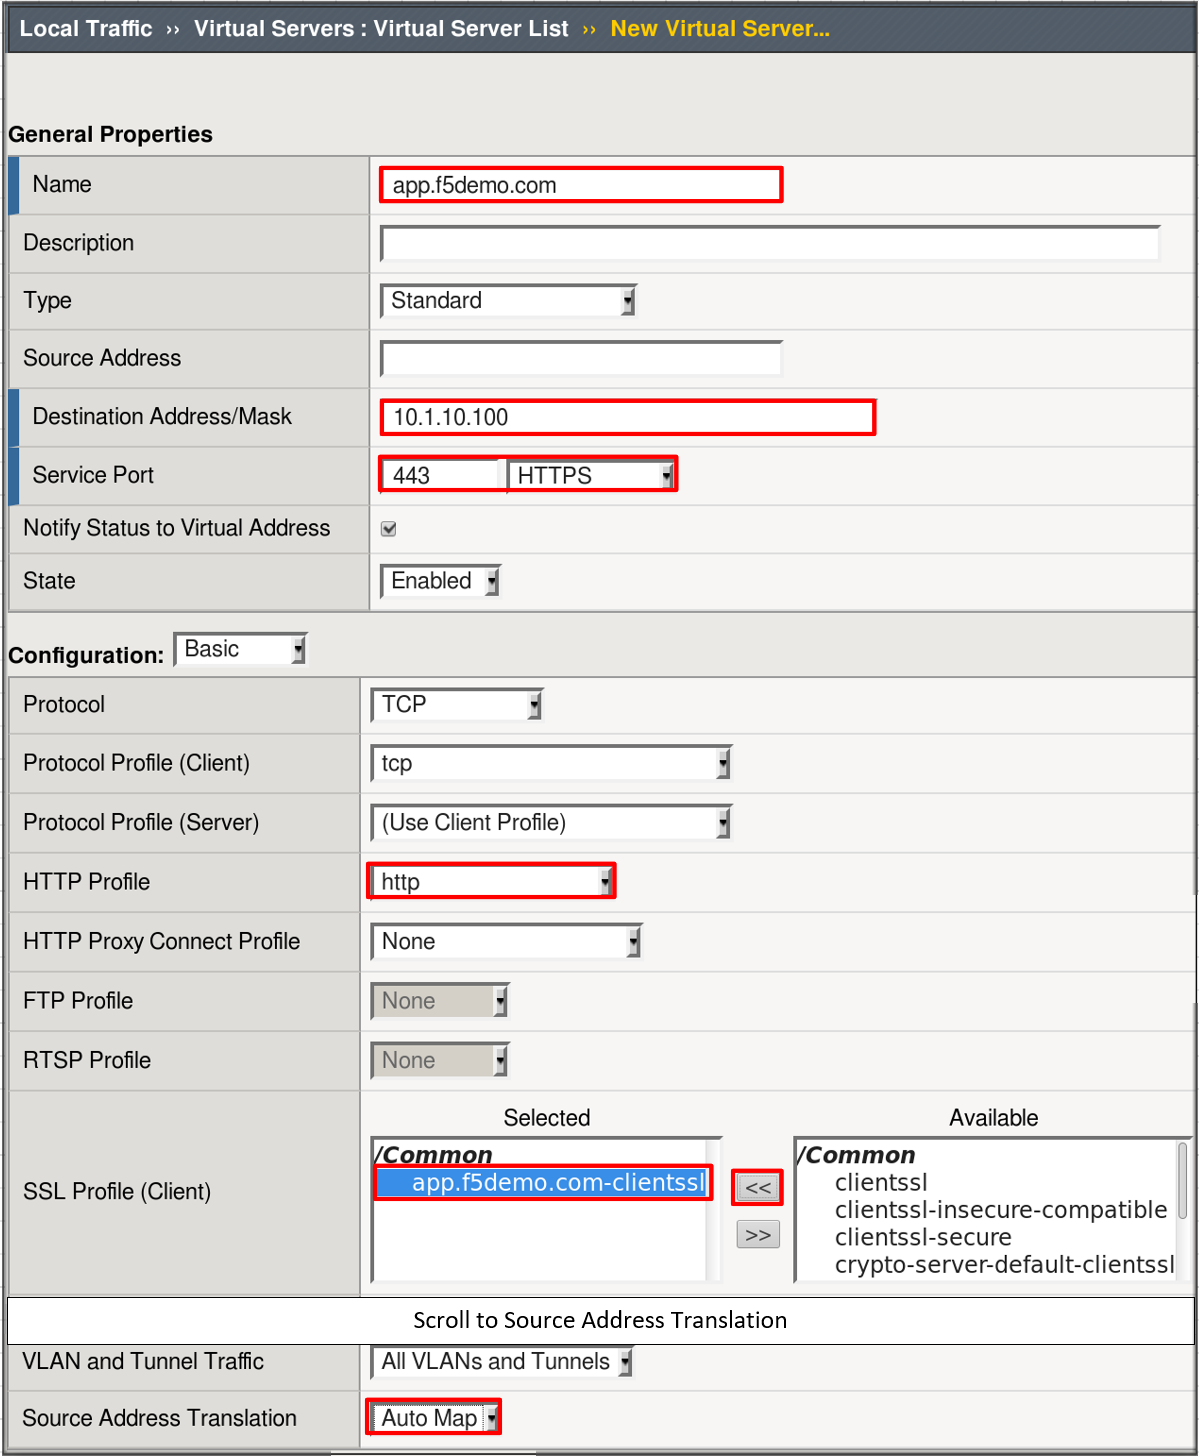
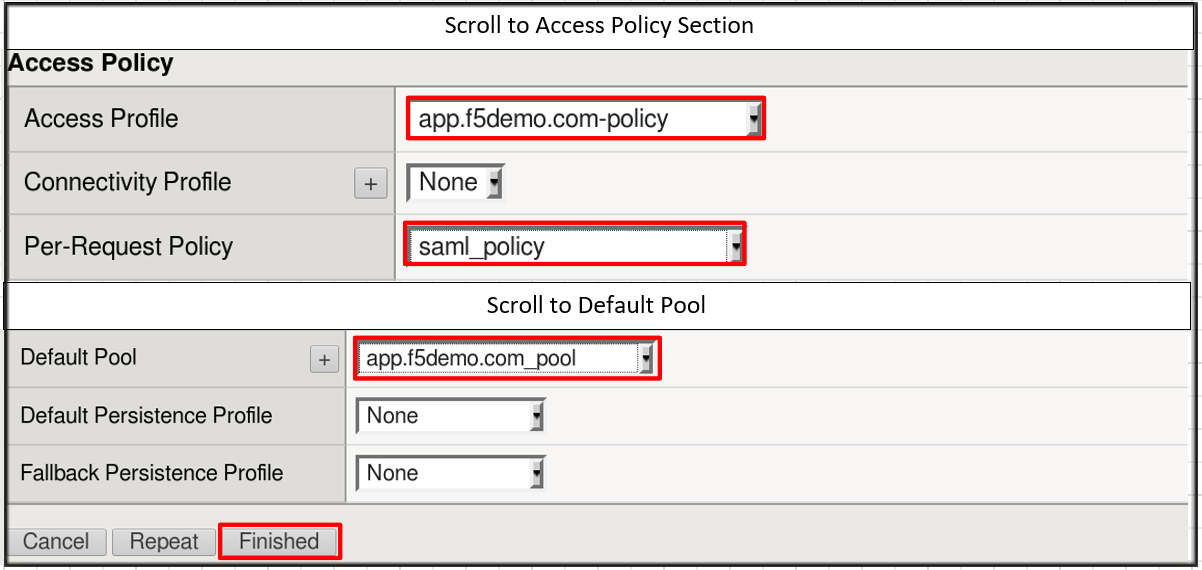
TASK 5: Create the SP Virtual Server & Apply the SP Access Policy

Refer to the instructions and screen shots below:

  1. Begin by selecting: Local Traffic -> Virtual Servers
  2. Click the Create button (far right)
image017
  1. In the New Virtual Server window, key in the following as shown:
    • Name: app.f5demo.com
    • Destination Address/Mask: 10.1.10.100
    • Service Port: 443
    • HTTP Profile: http (drop down)
    • SSL Profile (client): app.f5demo.com-clientssl
    • Source Address Translation: Auto Map
  2. Scroll to the Access Policy section
    • Access Profile: app.f5demo.com-policy
    • Per-Request Policy: saml_policy
  3. Scroll to the Resource section
    • Default Pool: app.f5demo.com_pool
  4. Scroll to the bottom of the configuration window and click Finished

Note: The use of the Per-Request Policy is to provide header injection and other controls.

These will be more utilized later in the lab.

image018

image019

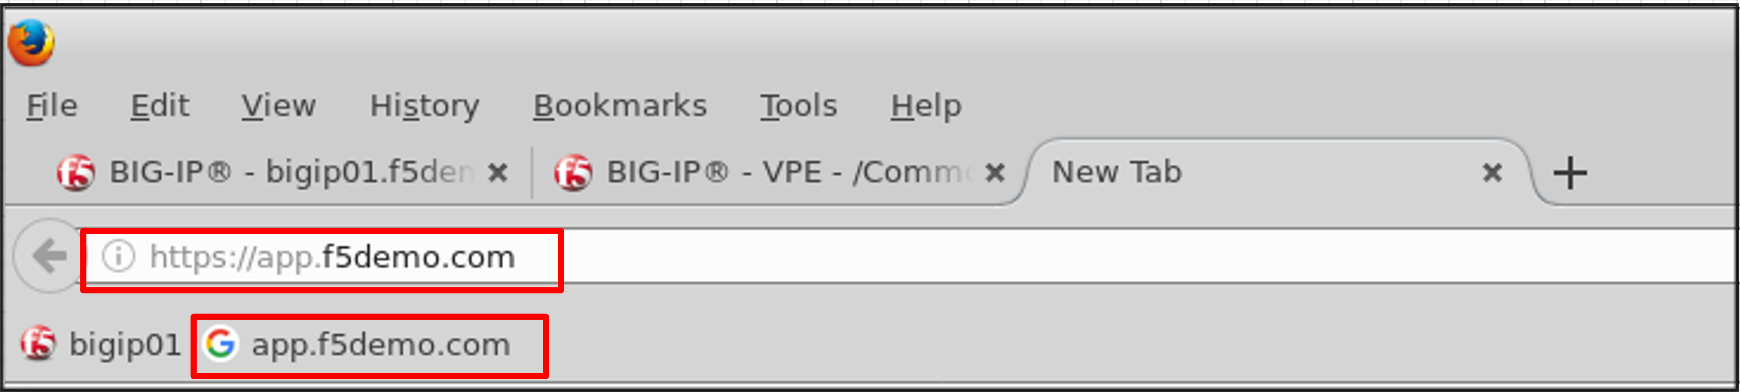
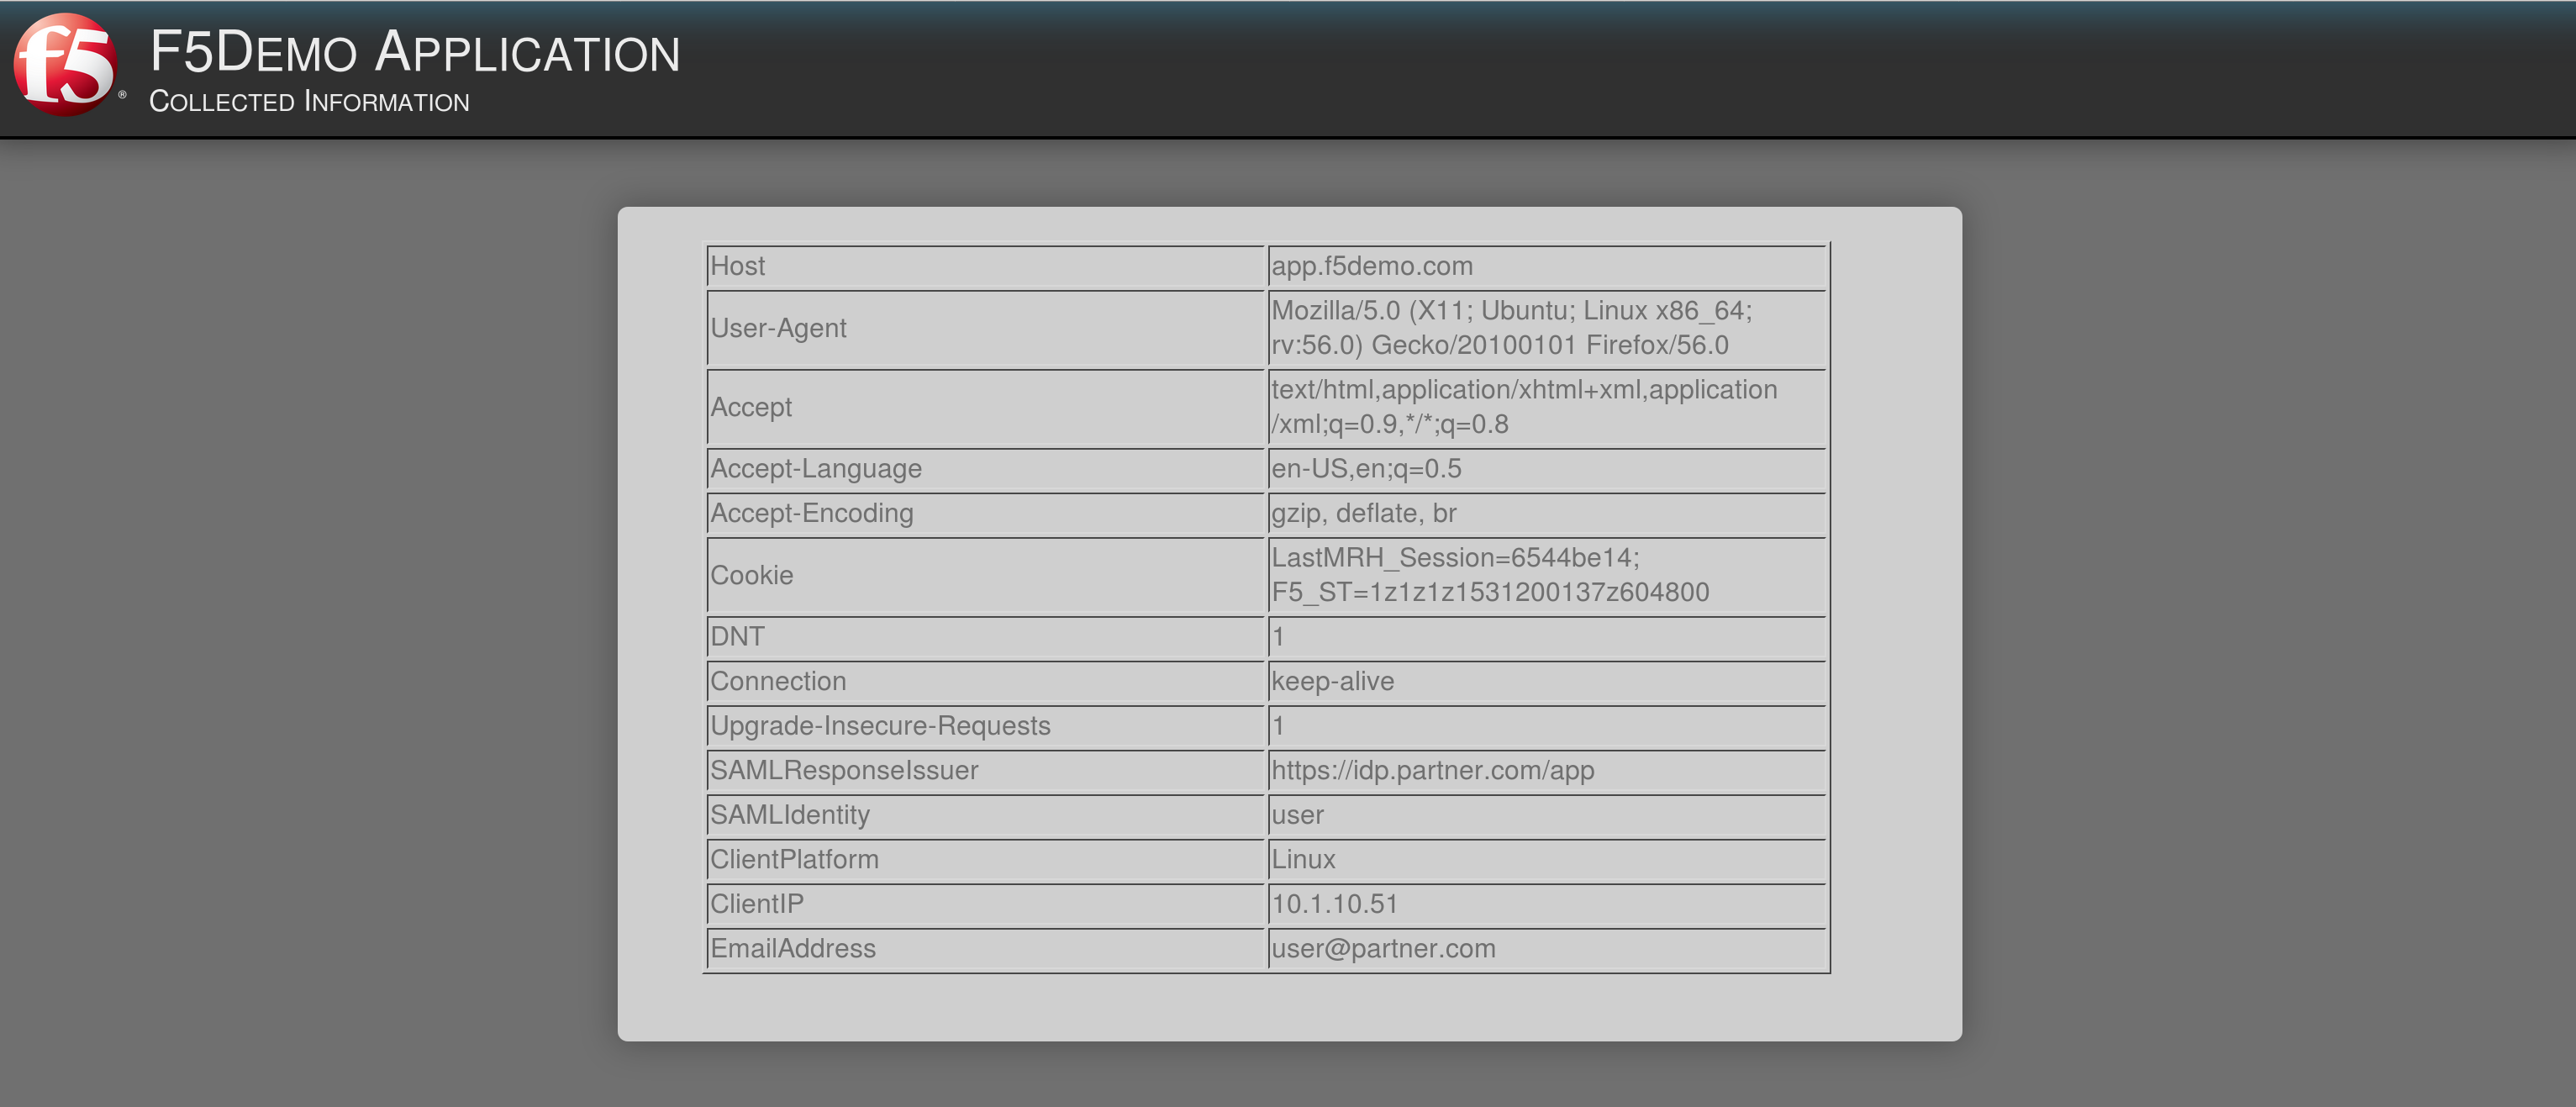
TASK 6: Test the SAML SP

Refer to the instructions and screen shots below:

  1. Using your browser from the Jump Host click on the provided bookmark or navigate to

    https://app.f5demo.com . The SAML SP that you have just configured.

image020
  1. Did you successfully redirect to the IdP?

  2. Login to the iDP, were you successfully authenticated? (use credentials provided in the

    Authentication Information section at the beginning of this guide)

    • Username: user
    • Password: Agility1
  3. After successful authentication, were you returned to the SAML SP?

  4. Were you successfully authenticated (SAML)?

  5. Review your Active Sessions (Access Overview -> Active Sessions)

  6. Review your Access Report Logs (Access -> Overview Access Reports)

image021